Guide To Custom PRTG MAP Objects

UTM mini guide to custom map objects

Paessler has announced that from PRTG Network Monitor 17.4.35 or later they will no longer assist with customisation.


We have reached out to Paessler asking if they had a custom map object or custom reporting parameter’s manual. Unfortunately the answer was;


“I’m afraid there is no documentation on all parameters.”


So here at UTM, we have decided to create our own mini guide to get you started.

MAP Object

PRTG MAP Objects are small HTM files that contain the PRTG Dashboard visual elements that allow you to organise a dashboard to meet your objectives. 


You can add as many new objects as you want to by duplicating one of the existing files and editing it as desired. It is not recommended editing the original files supplied by PRTG because your changes may be overwritten when an update is installed.


All map objects are located in the “PRTG Network Monitor\webroot\mapobjects”  directory.   MAP objects need to have a .htm extension in order for PRTG to include them in the group name properties list.  
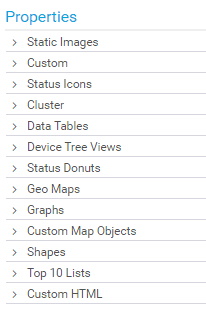
Group Names

Naming a Map Object

The first line of the file contains the group name and map objects name for display in the map editor in a comment field. You can edit these as desired.

<!--Shapes: Box (white with black border)--> 

In this example the object “Box (white with black border)” will appear under the “Shapes” group name property.

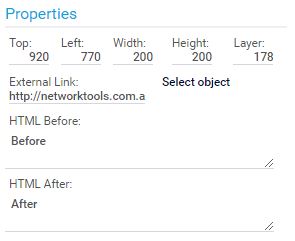
Map Object Basics & Placeholders

Lets have a look at the placeholder code and html output of a simple Box


Important: Apart from the object name you should typically only edit the section between the and tags.


You will see many placeholders <#tagename….>. These are replaced with a sensor’s / devices’ information at runtime.

<!--Shapes: Box (white with black border)-->

<div class="map_object map_graph" id="<@itemid>" objectid="<@objectid>" subid="<@subid>" style="<#mapobject type="coordinates" subid="<@subid>" mode="<@editmode>">">
<#mapobject type="objectgrip" mode="<@editmode>">
<#mapobject type="htmlbefore" subid="<@subid>">
<#checkobjecttype objecttype="sensor,probenode,group,device" nicemessage="true" id="<@objectid>">

	    <div style="display:block;width:<@width>px;height:<@height>px;background:#fff;border:2px solid black;">
		</div>

  <#mapobject type="htmlafter" subid="<@subid>">
</div>
 

As you can see below, the tags have been replaced at runtime with the correct HTML.


Looking at the box properties, we have the width and height which have been inserted in the style output.

<div style="display:block;width:200px;height:200px;background:#fff;border:2px solid black;">
		</div> 

We have the HTML Before, and HTML After display as denoted by the placeholder tags:

<#mapobject type="htmlbefore" subid="<@subid>">
<#mapobject type="htmlafter" subid="<@subid>"> 
Box (white with black border) Properties
<!--Shapes: Box (white with black border)-->

<div data-link="http://utm.com.au" title="" class="map_linkedobject map_object map_graph" id="mapelement_15573_70" objectid="0" subid="70" style="height:200px;width:200px;top:920px;left:770px;z-index:178" onclick="" data-original-title="http://utm.com.au">
Before
	    <div style="display:block;width:200px;height:200px;background:#fff;border:2px solid black;">
		</div>
After
</div>